Ingredients for 12 buns
- Yeast: 1 sachet dry or 30g fresh
- Sugar: 50g
- Milk: 250ml
- Water: 125g
- Eggs: 2 at room temperature
- Olive Oil: 50g
- Flour: 600g "strong" bread flour
- Salt: 2 teaspoons
Instructions
- Dissolve the yeast in the water with a tablespoon of the sugar. Place it in the oven with the light on and leave it for about 10 mins, until a thick froth has formed. DO NOT SWITCH THE OVEN ON! Just leave it with the light on and the door closed.
- In the meantime, beat the eggs and warm up the milk. The milk should be just a little warm to the touch. Not hot. If it's hot, the yeast will die. I usually blast it for 20s in the microwave straight from the fridge.
- Mix all the dry ingredients in a bowl: the flour, the salt and the remaining sugar.
- Add the beaten eggs, the olive oil, the milk, and the frothy yeast mixture to the last drop.
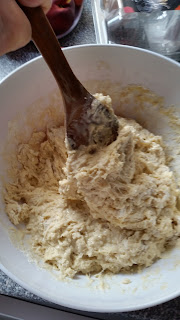
- Use a wooden spoon to combine everything. You just need to combine all ingredients. It doesn't matter if it's lumpy. It should be a thick sticky batter. [see pics 1 and 2]
- Cover with a towel or cling film and put it back in the oven. This should still be SWITCHED OFF and with the light on. If you have a cooking thermometer, you can play with the oven settings to maintain the temperature at around 30'C.
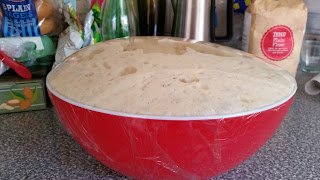
- Leave to rise for about 2 hours. It should more than double in volume. You should also see bubbles on the dough. [see pic 3]
- Take the bowl out of the oven and squash the dough to get rid of most bubbles. You can give it a gentle stir but try to not to knead it. The dough should still be sticky but very stretchy. [see pic 4]
- Take a baking tray and lay a sheet of baking paper on it. Then brush the paper with olive oil. Do not use a flat cookie tray. It needs to have a little bit of depth. Mine has a depth of 1cm.
- Now you need a well floured worktop and you can start making the buns. This recipe is for 12 buns so you can kind of guess how much of the dough you should use for each bun. Personally, I don't care if some end up slightly bigger and some others slightly smaller. They all get eaten, regardless. I use a dough ball that is slightly smaller than my fist to make one bun.
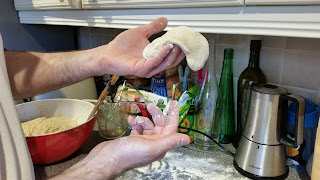
- To shape the buns, roll each ball on the floured worktop, then pick it up and let it relax on the palm of your hand. Use the other hand to pinch up the edges to make something that looks like a little money bag, then turn it around and tuck the edges underneath to make a dome-shaped bun and place it on the baking tray. Do this one or two dough balls at a time. If you divide the whole bowl into 12 balls and let them rest on the worktop, they might stick to the worktop and become more difficult to handle. [see pics 5 and 6]
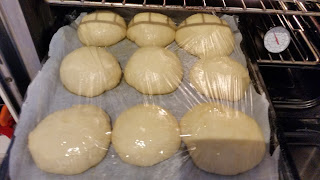
- Gently brush each bun with olive oil and loosely cover them with cling film. Do not seal them tight. They need room to rise. Leave them in a warm part of the kitchen for about an hour. They should just about double in volume and almost start merging into each other. [see pics 7 and 8]
- Bake for about 20 minutes at 180'C. I use a ventilated oven. I also use a water sprayer bottle as soon as I put them in the hot oven. Two or three sprays and quickly close the oven door. It seems to help building a nice crust.
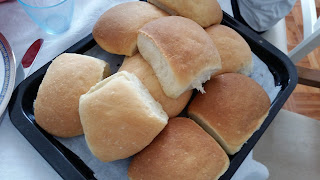
- Keep an eye on the buns. Yours might take more or less than 20 mins. A nice warm golden-brown color will tell you they are ready. [see pics 9 and 10]
- Enjoy.
Pictures